

Your first template with AI
In this tutorial an AI assistant designs the same conference badge as the editor tutorial: a photo, a name and a role, each a field that every generated badge fills with its own values. You write the brief; the assistant does the work through Paprika’s authoring tools. The steps below show each call it makes and what Paprika answers, so you can follow how it designs, looks at its work and fixes it.
Before you start
Section titled “Before you start”You need an assistant connected to Paprika’s authoring server (connecting an assistant), and two pictures in the folder you work in: photo.jpg, a sample photo of a person, and logo.png, your logo.
The brief
Section titled “The brief”Ask the assistant:
Design a Paprika template for a conference badge, A6 portrait, for the screen. At the top a dark green band with our logo (logo.png). Below it the attendee’s photo in a circle, then their name, large and bold, and their role under it. The name, role and photo change for every badge; use photo.jpg as the sample photo. Save it as badge.paprika and publish it.
An assistant isn’t a program: yours will word things its own way and may make other choices. What follows is a good run, and what Paprika answers to each step.
What the assistant does
Section titled “What the assistant does”Set up the template
Section titled “Set up the template”It starts an A6 template (105 × 148 mm is 297.64 × 419.53 points) and defines the typography once, as two paragraph styles: the role’s is based on the name’s, so it changes only its size and weight.
{ "name": "Conference badge", "width": 297.64, "height": 419.53 }New template "Conference badge", 297.64 × 419.53 pt (screen).{ "kind": "paragraph", "name": "Name", "style": { "family": "Inter", "size": 26, "weight": 700, "color": "#173e3c" }, "paragraph": { "align": "center" }}{ "kind": "paragraph", "name": "Role", "basedOn": "name", "style": { "size": 16, "weight": 400 }}Add the pictures and the fields
Section titled “Add the pictures and the fields”It adds the two pictures to the template, then the three fields, each with a label and a sample value. The photo is optional, with the sample photo as its default.
{ "path": "photo.jpg", "id": "sample-photo" }{ "path": "logo.png", "id": "logo" }{ "name": "name", "type": "text", "sample": "Ada Lovelace", "label": "Name", "description": "The attendee's name, as it should be printed"}{ "name": "role", "type": "text", "sample": "Speaker", "label": "Role" }{ "name": "photo", "type": "image", "required": false, "default": "sample-photo", "label": "Photo", "description": "A head-and-shoulders photo"}Every answer lists the template’s issues. Until frames show the fields, it says so:
Defined image field photo.- warning: field photo is used by no frameLay out the badge
Section titled “Lay out the badge”It draws the band, places the logo and the photo (a circle: an ellipse mask), and adds the name and the role in their styles. The name’s frame grows for a long name, up to 80 points, and then fits its text, shrinking it down to 60 %, rather than overflowing.
{ "id": "band", "shape": "rect", "x": 0, "y": 0, "w": 297.64, "h": 56, "fill": "#173e3c" }{ "id": "logo", "image": "logo", "x": 123.82, "y": 8, "w": 50, "h": 40, "fit": "fit" }{ "id": "photo", "field": "photo", "x": 73.82, "y": 76, "w": 150, "h": 150, "fit": "fill", "frame": { "mask": { "shape": "ellipse" } }}{ "id": "name", "x": 20, "y": 244, "w": 257.64, "h": 36, "text": "{{name}}", "paragraph": { "paragraphStyle": "name" }, "frame": { "growth": "vertical", "maxH": 80, "fitText": { "min": 60, "max": 100 } }}{ "id": "role", "x": 20, "y": 286, "w": 257.64, "h": 26, "text": "{{role}}", "paragraph": { "paragraphStyle": "role" }}Added text role on page-1 (fields: role).Issues: noneLook, and fix
Section titled “Look, and fix”It renders the page and looks:
{}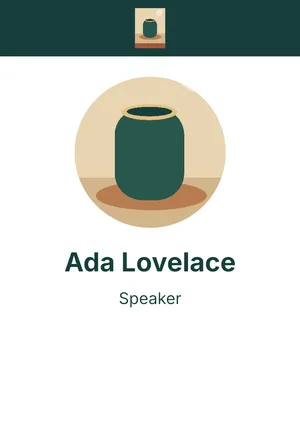
That looks right with the sample name. But badges get long names too, so it tries one in the sample values and looks closer:
{ "values": { "name": "Maria Fernanda Rodríguez-Castellanos" } }Issues: none{ "frame": "name" }
The name grew to two lines and runs into the role. Paprika reports no issue, as frames may overlap: this is what looking is for. The fix is to anchor the role to the bottom of the name, so it moves down whenever the name grows:
{ "id": "role", "y": { "target": "name", "at": [0, 1], "offset": 6 } }{ "region": { "x": 0, "y": 230, "w": 297.64, "h": 110 } }
It puts the sample back and looks at the whole badge again:
{ "values": { "name": "Ada Lovelace" } }{}Check, save and publish
Section titled “Check, save and publish”Last, it checks the whole template, saves the package and publishes it:
{}- layout and values: no issues{ "path": "badge.paprika" }{ "filename": "badge.paprika" }Published tpl_… version 1.What you have
Section titled “What you have”badge.paprika is an ordinary template: open it in the editor with Open package to look at it, change it and publish it again. It is published as badge.paprika, so rendering it from the API works on it as on the editor tutorial’s.
Next, read working with an assistant for briefing it well and what to watch for in its work.